 24/7 Online Booking
 Damage Free Lash & Brow Treatments Guarantee
Nano Brow Tattoo Healing Process: What to Expect After Your Appointment
The nano machine brow tattoo technique is becoming increasingly popular due to its precision, natural results, and less invasive and much quicker healing process. For more detail comparison please read our other blogpost here. Unlike traditional microblading, which uses a hand tool, the nano machine technique involves a digital device with an ultra-fine needle that deposits pigment into the skin. This method allows for more detailed strokes, providing a softer and more natural look.
If you’re considering this technique or have already booked your appointment, it’s important to understand the brow tattoo healing process to ensure optimal results. In this blog post, we’ll walk you through each stage of the healing process, from what to expect immediately after your appointment to long-term care tips.
What to Expect Immediately After the Procedure
Right after your nano machine brow tattoo session, your brows will appear darker and more defined than you might expect.
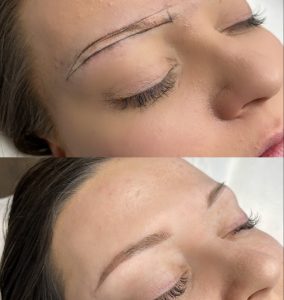
This is due to the fresh pigment sitting on the skin’s surface, as well as some natural swelling and healing. The bold look will subside as your skin heals and the pigment settles. You might also notice slight redness and swelling which might be misunderstood as the colour of the pigment when it’s actual from the redness of the skin, especially if you have sensitive skin. This is completely normal and should subside within a day or maximum 3 days. Keep in mind that while the nano machine technique is less invasive than microblading, it still involves creating tiny punctures in the skin, so proper aftercare is essential.
Immediate aftercare tips:
– Keep your brows dry for the first 24 hours.
– Gently blot any lymph fluid that forms on your brows with a clean tissue.
– Avoid touching or rubbing your brows with dirty hands.
– Use a healing ointment (will be provided by us) to keep the area moisturized.
Stage 1: Days 1-2 – Bold Brows and Initial Healing
In the first two days after your appointment, your brows will remain darker and bold- around 30% darker than the actual colour when it has fully healed. This is because the pigment hasn’t yet settled into the skin. During this time, your brows will also feel slightly sensitive or tender, and the skin around the area may feel tight and sore. Swelling should reduce after the first day, but your brows will continue to look darker than the final result.
Aftercare tips for Stage 1:
– Keep your brows dry and avoid any moisture, including sweat.
– Do not apply makeup or skincare products to the brow area.
– Avoid sleeping on your face to prevent disturbing the healing skin.
– If needed, apply the recommended healing ointment, but do not over-apply.
-Wash your face with a small facial towel so as to prevent your brow from getting too wet and stinging in the shower.
Stage 2: Days 3-5 – Brow Darkening and Light peeling
By Day 3, the brows may appear even darker (but still a lot more natural than microblading) as the pigment starts to settle into the skin. It’s also common to experience light peeling of skin during this period. The scabs will be minor and negligible (just like dry skin flaking off) since the nano machine technique causes less trauma to the skin, but it’s important not to pick at them. Your skin is working to heal the tiny punctures created during the tattooing process, and scabs help protect the pigment as it integrates deeper into your skin.
Aftercare tips for Stage 2:
– Avoid wetting your brows, including during showers or face washing.
– Do not touch or pick at the scabs—let them fall off naturally.
– apply the recommended aftercare ointment sparingly.
– Stay out of direct sunlight, as UV exposure can affect the healing process.
– Can resume light exercise.
– Shower is possible but allow water to trickle down from your head instead of facing up to direct water.
Stage 3: Days 5-7 – Peeling and Flaking
As the healing process continues, you’ll start to notice peeling and flaking around your brows. This typically happens around Days 5-7. Your skin will begin to shed, and the scabs may flake off, revealing lighter patches underneath. This is a normal part of the healing process, but it can be alarming if you’re not expecting it. During this stage, your brows may appear uneven or patchy, but don’t worry—this is temporary. The pigment is still settling, and your skin needs time to fully heal.
Aftercare tips for Stage 3:
-Let the flakes fall off naturally; do not peel them off, as this can cause pigment loss.
-Keep the brow area moisturized using a light layer of aftercare product, but don’t overdo it.
Stage 4: Days 7-10 – Brows Start to Lighten
By Day 7-10, the majority of the flaking will be complete, and your brows will start to lighten. They may appear significantly lighter than they did right after the procedure, and you might even feel like they’ve faded too much. This is a common concern during the healing process, but it’s important to remember that the final color won’t appear until the skin has fully healed. At this stage, your skin is still in the healing process, and the pigment will continue to settle and develop over the next few weeks.
Aftercare tips for Stage 4:
-Continue to keep your brows dry, and avoid sweating or steam as much as possible.
– Protect your brows from sun exposure—consider wearing a hat or applying a broad-spectrum SPF.
– Avoid applying makeup, exfoliants, or any skincare products around the brow area.
Stage 5: Days 10-14 – Brows Begin to Settle
Around Day 10 to 14, your brows will start to settle into their shape, and the pigment will begin to appear more even. However, some areas might still look a little patchy or uneven. This is completely normal and will improve over time as the pigment continues to settle into the skin. At this point, your brows will be more stable, but they are still healing, so it’s essential to keep following the aftercare instructions.
Aftercare tips for Stage 5:
– You can begin returning to your regular skincare routine, but avoid harsh exfoliants or peels near your brows.
– Be gentle when cleansing your face to avoid irritating the brow area.
– Continue applying SPF to protect your brows from UV rays.
Stage 6: Weeks 2-4 – Final Color and Touch-Up Appointment
By the 2-4 week mark, your brows should be fully healed on the surface, and you’ll start to see the true color of your tattooed brows. The pigment will have settled into the deeper layers of your skin, giving your brows a more natural look. However, if you notice any light spots or areas where the pigment didn’t take as well, a touch-up appointment may be necessary. A touch-up is typically recommended around 6 weeks after your initial session. This allows your brow artist to perfect any areas where the pigment has faded or to adjust the shape or color if needed.
Aftercare tips for Stage 6:
– Book your touch-up appointment if necessary to ensure long-lasting, even results.
– Continue protecting your brows from sun exposure to prevent premature fading.
– Avoid using retinoids, glycolic acid, or other strong exfoliants around your brows to preserve the pigment.
Stage 7: Long-Term Brow Tattoo Care
Once your brows have fully healed and your touch-up session is complete, maintaining your nano machine brow tattoo is relatively simple. While nano brow tattoos are semi-permanent, they can last anywhere from 12 to 24 months with proper care.
To prolong the life of your brows:
-Avoid excessive sun exposure, as UV rays can cause the pigment to fade more quickly. Always apply SPF when spending time outdoors.
-Avoid harsh skincare products that can cause exfoliation or thinning of the skin, such as retinoids or acids, around the brow area.
– If you have oily skin, you may need more frequent touch-ups, as oil can break down the pigment faster.
Conclusion: The nano brow tattoo healing process involves several stages, from dark, bold brows immediately after your appointment to a lighter, more natural look as your skin heals. Patience and proper aftercare are key to ensuring the best results.
To summarize, here’s a breakdown of the healing stages:
Days 1-2:Brows are dark and bold, with slight swelling.
Days 3-5: Light scabbing begins as the skin heals.
Days 5-7: Peeling and flaking occur, revealing lighter patches.
Days 7-10: Brows appear lighter as they continue to heal.
Days 10-14: The pigment begins to settle.
Weeks 2-4: Final color appears, and touch-up may be needed. If you follow these aftercare tips and understand the healing stages, your nano machine brows will look flawless, natural, and long-lasting.
Ready to get your dream brows? Book your nano machine brow tattoo appointment today with our team at Lash Sanctuary and achieve perfectly shaped, natural-looking brows that last!
